Form Based Authentication is used by all of companies who have deployed SharePoint site over the internet or they have the SharePoint sites published. Form Based Authentication is a feature provided by ASP.NET 2.0. As the name tells that it gives you a form for authentication when you try to access the SharePoint site (similar to a pop-up box that you get when you access the SharePoint site using the Windows authentication).In SharePoint the authentication happens in the IIS and the authorization happens in SharePoint depending on the permission given to ths user.The Form Based Authentication is widely used when the people accessing your site are not the part of your Active Directory (AD) or basically not the part of your domain and at the same time you have a requirement telling that you would like these people (who are not the part of AD), when they try to access the site they would be authenticated. The only way possible is by storing the user credentials in a repository ( other than AD ) and telling SharePoint to use that repository as the authentication provider. In MOSS 2007 we could store the user credentials in AD , ADAM (Active Directory Application Mode) and in SQL Server. For SharePoint to use the Form Based Authentication (FBA) we have to do some amount of custom coding. So if you are familiar with the configuration of FBA in MOSS 2007 this post should not be very difficult to follow. Next I would discuss the steps that took to achieve the FBA in SharePoint Server 2010 using SQL Server to store the users.
- To start configuration form based authentication create a new web application and choose the Authentication as Claim Based Authentication.
- Choose the new IIS Site and mention suitable port number or mention the host header. If the host header is specified then remember to add A-record in the DNS.
- In the security configuration section choose NO for allow anonymous access and for the use of SSL.
- In the Claims authentication types tick the "Enable Windows Authentication" and under that choose NTLM in the Integrated windows Authentication.
- Next check the "Enable Form Based Authentication" and under that mention the name for ASP.NET membership provider name and the ASP.NET role manager name. I gave sqlmember and sqlrole respectively.
- Leave the other options to the default and Click OK and create the new web application.
- Also create a site collection using a suitable template.
Now we need to create a database in SQL Server in which we would be storing the users credentials. For that you need to go to C:\windows\Microsoft.Net\Framework\v2.0.50727 and there look for a exe called
aspnet_regsql. Double click on the exe and a wizard will pop up. Click next on the first and second screen of the wizard. In the third screen enter the SQL Server name and leave the database name to default.Click next and then you would have created a database that you talk to a ASP.NET Application.The created database name would be aspnetdb. Now we need to create the users in the SQL Server. You can either write a application or code that helps you do this or use a tool (like I do) and create the users easily. The tool that I use is called
Membership Seeder . This tool is available at
http://www.codeplex.com/ . You will find many other similar tools in this web site.
Any tools used from codeplex site in production is not supported by Microsoft. This tool is basically used to create dummy users in the aspnetdb. I will not cover how to use the tool as the instructions are given in the site where you download this tool. By the way this tool is FREE. Once the users are created then we need to deal with the coding aspect of the configuration.We need to make chances in three web.config file and they are:
- The newly created Web Application.
- The Central Administration Web Application.
- The Security Token Service Application.
So lets start of with the central administration web.config file, which can be found in C:\inetpub\wwwroot\wss\VirtualDirectory and here double click on the folde with an usual number. In my case the folder name was 23018. All other virtual directory except central administration virtual directory would have the servername and the port number or the host header name and the port number. After opening the CA folder, create a new folder and take the copy of the web.config file and save it inside the new folder. This step is very important as you are taking the backup of the web.config file which is the most important file for the web application. Once you have backup copy of it then open the web.config, which is a XML file. It is preferable to open in Visual Studio as it easy to edit in it. If you dont have VS then it can be opened in notepad as well. Inside this webconfig file search for the "system.web" tag
.Once you find it you need to add the CODE1 above the tag "system.web" and CODE2 below the tag "system.web".
CODE1

CODE2
 One you have done the above, save the file and close it. So the CA web.config file is done. Next lets go to the STS (Security Token Service ) service application web.config file. The easy way to get to the STS web.config file is open IIS Manager. Expand the sites section and then expand the SharePoint Web Services section. There you would find the SecurityTokenServiceApplication, click on it and open the content view (content view option is avalable in the middle section at the bottom of the IIS Manager). Next click on explore option from the Actions Sections (the rightmost section). Or just follow this path : C:\Program Files\Common Files\Microsoft Shared\Web Server Extensions\14\WebServices\SecurityToken. This will lead you to the web.config file of the STS service application. Again do not forget to take the backup of this file before making any chances to it. Then open the web.config file. In the STS web.config file you will not find the tag "system.web". Hence we need to opening the closing tages of the "system.web". (Refer the snapshot) .So we need to add the CODE1 above the "system.web" and the CODE 2 just below "system.web". So the entire set of code would look like the following:

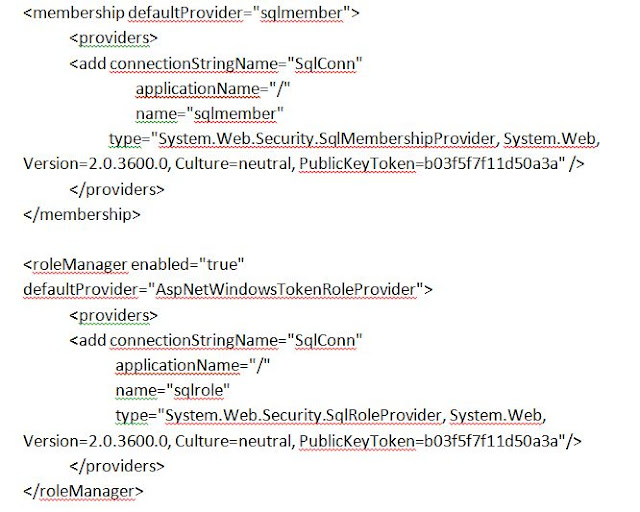
I pasted the entire above code under the closure of the tag "system.net" in the STS web.config file. Now the last place where we need to do the coding is the web.config file of the newly created web application. But making modification in this web.config file is slightly different as we would already have the tags for and . Hence we need to be a bit more careful here. So open the virtual directory of the newly created web.config file by navigating to C:\inetpub\wwwroot\wss\Virtual Directory\ .Once opened take the backup of the web.config file by creating a new folder and pasting a copy of the web.config file in it. Open the web.config file and search for the membership tag defined. You will see that we already have the membership and the rolemanager providers in the web.config file. We just need to add our membership and roleprovider entries. In the below snapshot I have highlighted the code snipnet that you need to add in the web.config of the newly created web application. Also notice that the rolemanager provider and then the membership provider.

We also need to add the CODE1 as well. Remember that you add above the and this SHOULD be above the and provider that you just added. The best way is to find the first occurance of the "system.web" in the web.config and add the CODE1 just above it.
Once the above things are done then the hardest part is finished. Now we need to the CA site,click on the Manager web application, choose the newly created web application and then click on User Policy. You would get a pop-up box. Click on Add Users and then choose the zone ( in our case it is the default zone) and then add users. These users are the one that you created using the Membership Seeder tool are are available in SQL Server aspnetdb database. If the user name gets resolved then the code is working fine. Next type the URL of the newly created web application and you would get a new form where in the drop down you would have two options. 1. Windows Authentication and 2.Form based Authetication. Choose Form Based Authentication and you would be given another form to add the username and the password. Put the username of the user present in the aspnetdb and the associated password. Then you would be able to login in and hence you have successfull configured form based authentication.
Hurry!!!..Finally Done!!....


 One you have done the above, save the file and close it. So the CA web.config file is done. Next lets go to the STS (Security Token Service ) service application web.config file. The easy way to get to the STS web.config file is open IIS Manager. Expand the sites section and then expand the SharePoint Web Services section. There you would find the SecurityTokenServiceApplication, click on it and open the content view (content view option is avalable in the middle section at the bottom of the IIS Manager). Next click on explore option from the Actions Sections (the rightmost section). Or just follow this path : C:\Program Files\Common Files\Microsoft Shared\Web Server Extensions\14\WebServices\SecurityToken. This will lead you to the web.config file of the STS service application. Again do not forget to take the backup of this file before making any chances to it. Then open the web.config file. In the STS web.config file you will not find the tag "system.web". Hence we need to opening the closing tages of the "system.web". (Refer the snapshot) .So we need to add the CODE1 above the "system.web"

FileVista is a web file manager for storing, managing and sharing files online through your web browser. It is a web based software which you install on your web server to fulfill web file management requirements of your company or organization. This web file manager allows your users to upload, download and organize any type of file with an intuitive user interface.
ReplyDelete